
As someone who started being more into make-up just one year ago, I’ve always felt as though ‘smokey eye’ can mean multiple things, depending on who’s talking about it. So to help clear the confusion, I’ve set out to make a list of various techniques, and what various make-up artists recommend. Here, we’ll focus on Lisa Eldridge. Hopefully, with more information appearing in the same place, it will be easier to spot what all these techniques have in common, and where they differ.
But, the gist of it is this: smokey eye make-up can cover a variety of colors – from browns, to grays, to blacks – even green, blue, or purple. There is also some variety in terms of color placement and intensity: for example, you can shade the outer corner of the eye to look darker than the rest, or instead use the same amount of color all over. You can also keep the shades a bit lighter, or go full-on black for a more ‘grungy’ look (you’ll see this below). You can also add some shimmer… or keep it 100% matte. There are so many choices. 🙂
The key idea is about creating darkness / a shadowy halo around the eye, in a gradient which fades upwards and outwards. But how exactly you achieve that, and whether you get a little more creative, is entirely up to you!
If you want details, here we go.
On this page:
- 1. The ‘classic’ smokey eye
- 2. The ‘everyday’ smokey eye
- 3. The Kendall Jenner / ‘grungy’ smokey eye
- 4. The ‘simple’ smokey eye
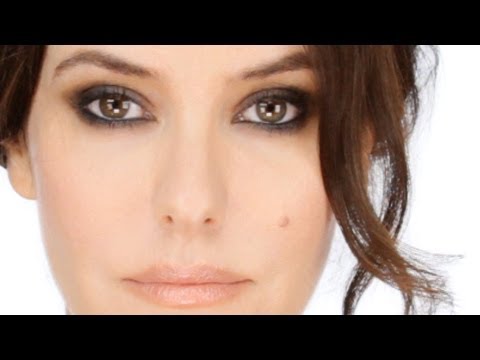
A. Classic shades: browns, grays, blacks
1. The ‘classic’ smokey eye, from May, 2013:
Summary of technique: With a fairly light brown shade, pat the pigment across your lids with a flat brush, roughly up to / slightly above your socket-line. Next, go in with a darker shade and a bushy brush, and start working the darker pigment over the outer corner, and in the crease. Buff away, and then slowly build up more dark pigment in that area. Line the entire lash line (on upper + lower lid) with a dark kohl pencil, and with a brush, start smudging that kohl around. Finish off with a thick coat of mascara, starting from the very base of the lashes. You’re now ready to clean up fallout and put on face make-up!
Useful tip #1: When coloring your eyes, check the placement of your eyeshadow with your eyes open, and while looking straight ahead. [IMO, it’s so tempting to do your eye makeup with each eye closed – and you can indeed have surprises that way. When you finally open your eye, you might find that it’s actually not well framed by the shadow because it’s gone too high, or isn’t too high enough etc. So, keep your eyes open to check.]
Useful tip #2: When you blend the eyeshadow, use a big, bushy brush to diffuse the pigment around your socket-line.
Useful tip #3: Eyes first, skin later. With a smokey eye, there will usually be fallout to clean up.
Useful tip #4: Smudge the lower lash line some more just after you’ve finished your face make-up. This will ensure that the dark shade transitions seamlessly to any foundation / under-eye concealer you have applied.
2. The ‘everyday’ smokey eye, from October, 2013:
Summary of technique: This video uses a cream eyeshadow stick, instead of powder eyeshadow. Apply the stick all over the mobile lid, and blend it with a bushy brush, right up to the socket line. Then drag the stick over the lower lash line, and with a q-tip, blend in the product. Add plenty of mascara from the roots of the lashes.
Useful tip #1: You can also tap the eyeshadow stick along the lower lash line as a sequence of little dots, rather than a continuous, solid line. You can then blend together these little dots.
Useful tip #2: You can add thicker layers of mascara in the outer corner, to get a nicely defined eye shape.
3. The Kendall Jenner / ‘grungy’ smokey eye, from January, 2016:
Summary of technique: You start by applying a black, cream-gel eyeshadow over the mobile lid, and buffing it around with a brush. You can repeat these steps until you build the intensity you want. With a pencil brush, smudge the same product around the lower lash line. Further, use a creamy black pencil to line the upper and lower lash lines for added intensity – and smudge that pencil around too. Add plenty of mascara. You could call it quits at this stage. If not, you can play it up some more, by getting some highlighter on a brush (or some shimmery cream eyeshadow, or even a tiny bit of lip gloss!), and tapping it gently around the center of the mobile lid.
4. The ‘simple’ smokey eye, from June, 2017:
Summary of technique: After adding a thin layer of eye primer all over the lids, you apply a dark, mat shade (example: dark brown) over the mobile lids, up to the crease, but not over it. Then, to blend out the pigment, get a lighter brown shade with which to diffuse the darker one around the crease / socket line area. You can then line the outer half of the upper lid with a black pencil, and the outer corner of the lower lid. Use a pencil brush to smudge around the outer corner – sideways along the lashes, and upwards at the extremity of the eye. You can also get a winged effect if you add some false lashes in the same area. Another thing you can do is add a tiny bit of shimmer at the inner corner of the eyes.
B. Colorful shades: greens, blues, purples
1. Glamorous green smokey eye, from December 2011
Summary of technique: You can start with a silver, shimmery cream eyeshadow as your base, and allow it to set. You can then follow up by patting some shimmery green powder onto the lid. With a pencil brush, you can use the same powder eyeshadow to line the lower lash line. Next, pat a very dark matte green onto the outer half of the lid, and start blending it softly around the crease. We now return to the lower lashline, and buff around the same matte, dark green – especially in the outer corner. Add some black gel eyeliner all around the upper lash line, and use a pencil brush dipped into the dark green shade to smudge the eyeliner around. You can retrace this same procedure along the lower lash line – again, particularly around the outer corner. Curl your lashes, and add a motherload of mascara. Done!
Useful tip #1: If your eyes start watering while you are applying makeup, simply get a q-tip infused with make-up remover, and gently wipe away any smudges or drips. Then dip another q-tip in translucent powder, to dry the area. Once this is done, you can go back in with a pencil brush, and patch up.
Useful tip #2: If you want to play up the look, use some silvery green shimmer in the inner corner, and blend it softly into the darker shades.
2. Navy smokey eye, from January 2012
Summary of technique: Start by priming your lids, and then pat a navy shade across them, up to the crease. Go gentler and gentler with the brush as you approach the crease, which leads to a gradient of color. Also remember to open your eye to guide the eyeshadow placement. Using a pencil brush, as usual, slide some navy shade along the lower lash line as well. As you descend, make sure to let the color fade more and more. Now use a black pencil / liner along your lashes and your waterline, which you can then smudge with more navy shadow loaded onto a brush. You should now see a gradient that goes from black to navy, and then fades away completely into your normal skin color. Next, you can add even more of the navy shade to intensify the outer corner of the lid, particularly just above the crease – but make sure to give it soft edges. At this point, you know the drill – curl those lashes and coat them in a lot of mascara.
Useful tip #1: When using the black pencil across your lash line, don’t worry about how precise the line is – you’ll be smudging it around with navy color anyway.
Useful tip #2: As mentioned before, keep your eyes open to see just how far up to spread the dark, navy shade. A little bit of the blended navy shade should still be visible above your eye, even when it is open.
Useful tip #3: If you think that the navy shade is not fading gradually outwards, but rather shows a harsh line, you can use a very light shade of blue to blend the navy outwards, into the normal color of your skin.
3. Lavender smokey eye, from August 2014
Summary of technique: First, prime your lids. Next, we can apply a satiny, cool-toned shade of lavender / violet across the lid – again stopping juuust above the crease. Use the same shade to line the lower lashes. Then add a warmer plum eyeshadow in the outer corner of the eye, using a pencil brush. With a second, bushier one, now diffuse the plummy shade you’ve just applied. To make the look more intense, use a gray pencil to darken the lash line, and then diffuse that too with a pencil brush. Repeat the same procedure (pencil & diffuse) on the lower lash line. You can add a frosty pink color in the inner corner, with a bushy brush, and then blend the color around softly. Finally, to quote Lisa: ‘And then lots n lots of mascara!’. For extra drama, if you like, you can add individual false lashes in the outer corner, to elongate the shape of the eye.
That’s about it. Hope this was useful, and I plan on doing a few more of these posts, but involving other make-up artists. It’ll be interesting to see if or how they might differ!
Lex

1 Comment